Portal Assets Development
The development of Webcenter Portal assets changed quite a lot on Webcenter Portal 12c.
Oracle WebCenter Portal's round-trip development, where the developer would be able to download assets directly from Webcenter Portal server, update them in Jdeveloper and later upload them back is no longer available. Along with round-trip development, DesignWebCenterSpaces ready-made application is also gone  .
.
A new application template named Webcenter Portal Asset Application is available in Jdeveloper 12.2.1 (as long as Webcenter Core and Webcenter framework addons are installed). This application can hold Asset Projects to to create or modify portal elements such as page templates, skins, layouts, page styles, Content Presenter templates, and Visualization templates. As you may notice you can no longer manage navigations as an asset and now the navigation is fully controlled by the page hierarchy. The process described below on how to create and upload a portal asset is very similar to oracle material available here.
- So first step would be to create a new application on Jdeveloper using the Webcenter Portal Asset template.
- On the second step of the wizard give a project name that refers the asset that you want to create, for example PageStyleThreeColumns.
- On the fourth step select the type of asset that the project will hold, in this case Page Style.
After the wizard is finished we will have a structure similar to this one:
Highlighted are two important files created. ThreeColumns.jspx is the page style itself that we need to customize. The file assetDef.xml is a new concept that stores metadata for the definition of our Portal Asset. You can change the values for asset-specific properties, such as displayName and the Description, by editing the assetDef.xml file.
One of the great things about asset development for Webcenter 12c is that you no longer need to copy files around or to setup configuration files in order to upload your assets. A new type of connection for Webcenter Portal Server is available. Just right-click the Connections folder in the Application Resources view and add the connection.
After the customizations on our page style are done its time for deployment. Just right click the project and select deploy. There will be available the option to deploy it directly to the Webcenter Portal Connection we created earlier. On the second step of the deployment we have to define the target of our deployment (if its a shared asset or restricted to a portal). Click Finish to deploy the asset, or click Summary to see a summary of your deployment selections before deploying. Open the Deployment - Log pane and check the status of the deployment. You can also click on the target URL on the Portal Server to view the recently deployed asset.
So far so good, great improvement when compared to Webcenter 11g, but there are a few catches. Since you can no longer download the assets from your portal server, special attention must be given when uploading the asset to the server to not overwrite changes made at runtime.
Multiple Portal Asset projects in one Portal Asset application
Another problem of the new model is that one Portal Asset Project can hold just a single asset. So if you portal has 2 skins, 2 templates 3 page styles you will have to create 7 Portal Asset projects. To make things worse if you try to add a new Portal Asset project on the same Portal Asset application the wizard to create the project does not have the step to select the asset type that we want to create, as shown on the image below.
Not having the asset creation on the wizard causes one issue in particular. When we add the new asset to the project it will not create the assetDef.xml, and without it we cannot deploy the project. Sure you could create one application for each asset, but this would mean several applications to manage the same type of entity, and if the Webcenter Portal server changes you have to change the connection in several projects.
The solution to have a single application with multiple asset projects is to manually create the assetDef.xml for each new project. In order to do that follow this steps:
- Create a new Portal Asset project;
- Add to it the desired asset (skin, page style, page template, ...).
- Right click the META-INF folder on Application Sources and select New -> From Galery.
- On the gallery go to the category General -> XML -> XML Document.
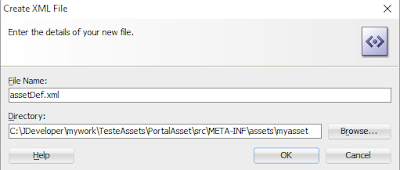
- On the Create XML File dialog set the file name to assetDef.xml and the directory must be: <project folder>src\META-INF\assets\<asset name> as shown bellow:

- Now edit the XML file like one of the examples bellow.
- If you try to deploy your asset now you will face an error like this one:

- Close Jdeveloper and open it again and you will be able to deploy. if you don't want to close it, you may use the refactor->rename on the assetDef file to make Jdev update its references.
For your reference, bellow are presented some examples of assetDef.xml, one for each type of asset:
<?xml version="1.0" encoding="UTF-8"?>
<name>ThreeColumns</name>
<displayName>ThreeColumns</displayName>
<sourcePath>/threeColumns</sourcePath>
<pagePath>ThreeColumns.jspx</pagePath>
<pageDefinitionPath>ThreeColumnsPageDef.xml</pageDefinitionPath>
</ns0:pageStyle>
|
<?xml version="1.0" encoding="UTF-8"?>
<name>PageTemplate1</name>
<displayName>Page Template 1</displayName>
<sourcePath>/pageTemplate1</sourcePath>
<pagePath>PageTemplate1.jspx</pagePath>
<pageDefinitionPath>PageTemplate1PageDef.xml</pageDefinitionPath>
</ns0:pageTemplate>
|
<value n="assetDescription" v=""/>
<value n="assetDirectory" v="\pageTemplate1"/>
<value n="assetDisplayName" v="Page Template 1"/>
<value n="assetType" v="Page Template"/>
|
<?xml version="1.0" encoding="UTF-8"?>
<name>PageTemplate1</name>
<displayName>Page Template 1</displayName>
<sourcePath>/pageTemplate1</sourcePath>
<pagePath>PageTemplate1.jspx</pagePath>
<pageDefinitionPath>PageTemplate1PageDef.xml</pageDefinitionPath>
</ns0:pageTemplate>
|
<?xml version="1.0" encoding="UTF-8"?>
<name>Skin1</name>
<displayName>Skin 1</displayName>
<resourceBundle>portal.skinBundle</resourceBundle>
<sourceMetadataFilePath>skin1/Skin1.css</sourceMetadataFilePath>
<skinId>Skin1.desktop</skinId>
<skinFamily>Skin1</skinFamily>
<skinExtends>skyros-v1.desktop</skinExtends>
</ns0:skin>
|
<?xml version="1.0" encoding="UTF-8"?>
<name>ContentPresenterTemplate1</name>
<displayName>Content Presenter Template 1</displayName>
<sourcePath>/contentPresenterTemplate1</sourcePath>
<pagePath>ContentPresenterTemplate1.jsff</pagePath>
<viewId>contentPresenterTemplate1</viewId>
<categoryId>oracle.webcenter.content.templates.default.category</categoryId>
<categoryDescription>Default display templates for multiple content items.</categoryDescription>
<categoryDescriptionKey>DEFAULT_LIST_CATEGORY_DESC</categoryDescriptionKey>
<categoryName>Default Templates</categoryName>
<categoryNameKey>DEFAULT_LIST_CATEGORY_NAME</categoryNameKey>
<templateType>list</templateType>
<categoryIsDefault>true</categoryIsDefault>
</ns0:contentPresenterTemplate>
|
<?xml version="1.0" encoding="UTF-8"?>
<name>VisualizationTemplate1</name>
<displayName>Visualization Template 1</displayName>
<sourcePath>/visualizationTemplate1</sourcePath>
<pagePath>VisualizationTemplate1.jsff</pagePath>
</ns0:visualizationTemplate>
|


